Physical Address
304 North Cardinal St.
Dorchester Center, MA 02124
Physical Address
304 North Cardinal St.
Dorchester Center, MA 02124
Helpful ideas. Squeaky value.
Helpful ideas. Squeaky value.

Someone on your team asks if you can share the Storyline course as a PowerPoint file for an upcoming presentation. You say sure, and then realize you have no idea how to actually do it. Storyline and PowerPoint look similar, but they’re built differently and there’s no direct import.
We discussed that in this post with some ideas.
Whatever you export from Storyline won’t include separate text boxes or shapes you can edit. You’ll get either a video or a flat image for each slide. Interactions won’t carry over, and neither will any content hidden on triggered layers.
You can simulate interactions in PowerPoint with hyperlinks to other slides using hotspots, but you can’t get the type of interactivity you get in Storyline. If you really need to retain the interactive elements, then it probably doesn’t make sense to convert to PowerPoint.
That said, both options work fine if the goal is getting the content into a format a presenter can use.
Publishing your Storyline course as an .MP4 is the simplest approach. Go to Publish, choose Video, and select your resolution and quality settings. The result is a single video file you can insert onto any PowerPoint slide.
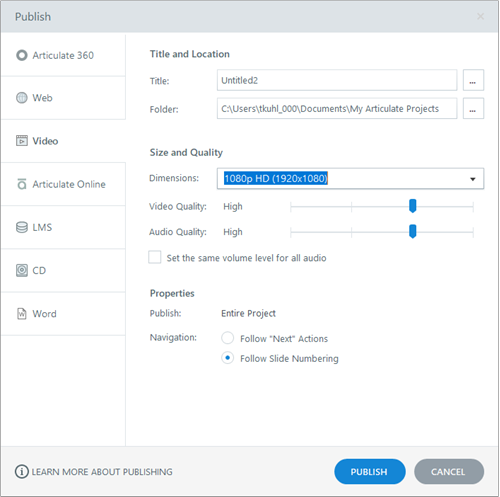
One thing to keep in mind: interactive elements don’t translate to video. If your course shows content on triggered layers, make those layers visible before you publish. Otherwise that content simply won’t appear in the final video.
Once you have a video in a PowerPoint slide you can leverage PowerPoint’s video triggering feature if you need.
Screen-capturing the course gives you more control than video. You’re working with individual slides instead of one big file. That makes it easier to customize each one when you drop them into PowerPoint.
Here are a few ways to capture your slides as images:
At that point, you can review the pictures and make edits. For example, where you have interactive instructions like the image below, you either add an interactive element to move to another slide or you add a colored shape to cover the instruction.
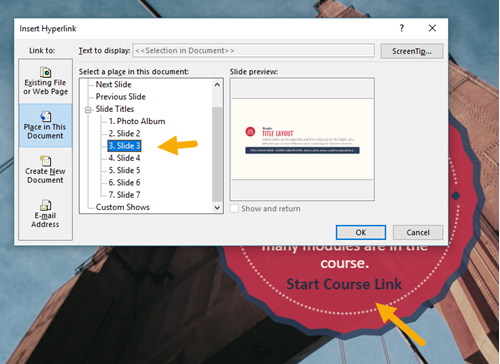
I like working with images better than video because there’s more flexibility. Video gives you a single file, whereas it’s easier to work with multiple images. You have more control over some customization at the slide level and can more easily introduce interactive elements in PowerPoint.
The one thing you can’t get in the conversion is a PowerPoint slide with separated text, pictures, and shapes. It doesn’t work that way. However, if you need the content in a PowerPoint format, the options above should work.
The approach you choose depends on what the presenter needs. If they just need to play content from a slide, video is the easiest path. If they need to present material slide by slide with some customization, images give you more to work with. Try both and see which one fits your workflow better.