Physical Address
304 North Cardinal St.
Dorchester Center, MA 02124
Physical Address
304 North Cardinal St.
Dorchester Center, MA 02124
Helpful ideas. Squeaky value.
Helpful ideas. Squeaky value.

At first glance, a pop-out character graphic looks like it needs a dedicated design tool. It doesn’t. The whole effect is two crops of the same image and a circle, layered in the right order. Once you know the steps, you can build this in a few minutes.
Here’s a similar tutorial for PowerPoint graphics.
Here’s the full process from start to finish.
Start by inserting a character from the Content Library. Crop the image until it’s square. Insert a circle shape and size it to roughly match the image. Crop the character image into a circle shape so it fills the frame cleanly.

Now position the character over the circle. Scale the character up so that the head and shoulders extend above the circle’s top edge. That overhang is what creates the pop-out effect.
Duplicate the character image. Take the first copy and crop it so it fits entirely within the circle. This becomes the background layer. Take the second copy and position it on top to cover the character where it extends above the circle. Adjust the crop on the second image until the overlap looks right.
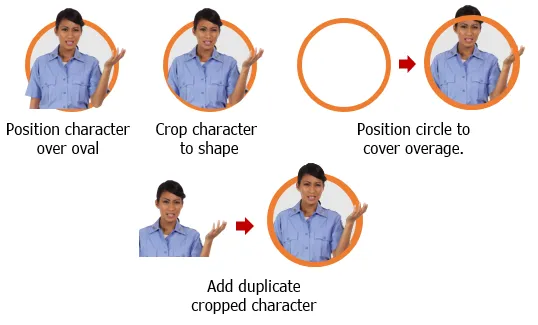
Group all the elements together when you’re done. Grouping prevents the layers from shifting when you move or resize the graphic. Once grouped, you can right-click and save it as a PNG, or save the slide itself as a PNG.
There are two ways to export. Right-click the grouped object and choose Save as Picture to export just the graphic. Or go to Save As and choose PNG as the file format to export the full slide. The full-slide approach works well when the background of the slide is part of the design.
Either way, you get a PNG that drops cleanly into a Rise image block or any other authoring tool.
The steps above cover the core technique, but seeing it done in real time makes the layering much clearer. A full video tutorial walks through each step in detail. There’s also a bonus tutorial for the header graphic at the top of this post, which uses the same approach.
This technique takes about five minutes once you’ve done it a few times. It works with any character from the Content Library and pairs well with the flashcard and image blocks in Rise. As your library of pop-out graphics grows, course visual quality improves without adding much time to the process. What other visual effects have you wanted to try in PowerPoint but assumed would be too complicated?